 I'm not sure how widely documented this feature of Windows Vista is but I use it frequently and thought I'd pass on the info.
I sometimes acquire MP3s in various formats and more often than not the ID3 tags are either incomplete, incorrect or just not there. ID3 tags are metadata stored with the audio data as part of the MP3 file and include information such as the track name, the artist name(s), the cover art and plenty of other things.
Well, before Vista you had to edit the tags with third party software, through Winamp or Windows Media Player (WMP) or whatever media player you use which wasn't too bad, so long as the software updated the files then and there. Winamp does this but you can only edit one file at a time while WMP lets you edit multiple files at once (e.g. album title) but it delays updating the physical files until later which is a pain if you want to transfer them to an external device for example.
So here are my simple steps on cleaning up ID3 tags using Windows Explorer in Vista and finally adding album art of a decent size using Windows Media Player.
Step 1
Firstly, make sure you can see the ID3 tag information in Explorer. Go to the folder with your MP3 files, select "Detail View" then right-click the titles of the columns. You can click on the "More..." option to get the complete list as shown in this screenshot. I like to select "#" (the track number), "Name" (the file name), "Size" (file size), "Type" (what type of file it is), "Title" (the song title), "Artists" (the album artist), "Album" (the album title), "Bit rate" (the bitrate of the MP3 file), "Genre" (the genre of the music) and "Year" (the year released).

Step 2
Now you can select the files in the list and edit the general information such as the Album Title, Album Artist, Genre and Year. To do this, just select the files and you'll see the aggregated details in the information bar at the bottom of the window. Clicking in any of these fields allows you to edit then save the details. Be careful you don't overwrite the track number, track title etc. as it will update all the files at once. If you want to edit a single file, just select the one you want and follow the same steps.

Step 3
Before adding album art, just check to see if the files already have them. In Windows Explorer set your view to Large Icons. If the files just have the default blue musical note icon instead of album art follow these steps to add it in. This will embed the image into the MP3 so when you transfer it around to various places you'll get the cover art. I usually get a 500x500 pixel image from Google Images, just search by artist name and album title, to serve as the cover art as WMP's 200x200 images are too small and badly compressed for my liking.
This is where we head over to Windows Media Player. Right click your folder and select "Add to Windows Media Player list" or "Play with Windows Media Player". Once you have WMP open go to the Library tab then select Now Playing in the left tree view. If the files haven't been added to your music library yet you'll see the Rating stars are grey, wait until they're all solid before continuing or you could get yourself into trouble (I've had WMP crash if it's trying to add cover art while adding tracks to the library).

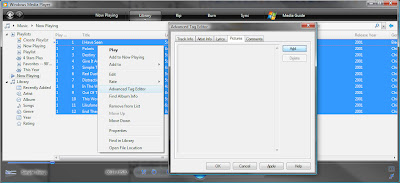
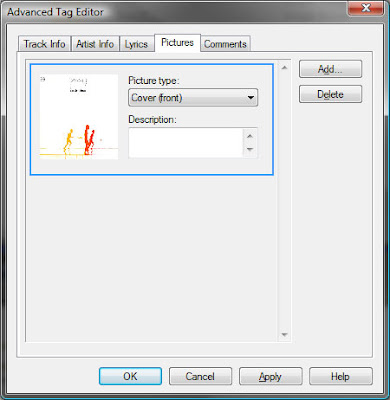
Now select all the files, right click any one of them and select "Advanced Tag Editor". Once that's open go to the Pictures tab and press "Add...". Select the JPEG you'd like to use as cover art making sure you set it as "Cover (front)" then hit OK. It may take a few seconds to update all the files and if one of them is playing (or was the previous track played) WMP will do it's whacky postponed update.

Head back over to Windows Explorer and hit refresh, you should now see each file has the cover art as its icon. If you want you can delete the system files that were generated (selected in the screenshot below). I like to keep folder.jpg so when I view the folder in icon view I get a nice image instead of a pile of images.

Done!
I know this isn't the only way to do it but it's the way I do it... hopefully it doesn't change too drastically in Windows 7.
3 comments:
Hey,
Thanks for this little tutorial.
I've been going through my music collection correcting the tags using Windows Explorer but was having a huge problem. A lot of my albums include songs by various artists so I make use of the "Album Artist" tag to keep track of it. But in explorer I kept on having a problem where if I changed the album artist, all of the artist fields would change to what I put as album artist. So I tried using the Advanced Tag editor in WMP and I was able to change only the album artist, finally...
Thanks again.
Windows Media Player in Windows 7 isn't as helpful as they've removed the Advanced Tag Editor. You can still do everything else in Windows Explorer but you'll have to find something else to add the cover art with.
That said, if you rip a CD with WMP in Win 7 it automatically embeds the cover art in the music file's meta data for you.
Online ID3 tag editor:
http://tagmp3.net
Post a Comment